Wednesday, 30 September 2015

S01E18 - Grouf Residence

This was a project I completed back in 2010 when I was studying for my Diploma of Building Design. The Project I selected to do my assignment on was the Grouf Residence by Ben Frombgen/Lundberg Design.


The home was built in Healdsurg, California in 2004 with a limited budget which required the architect to opt for something unusual, typically metal architecture is often reserved for industrial or commercial projects. The Grouf Residence is a pre-fabricated home built with large glass wall to taking advantage of the extraordinary views of the Sonoma County countryside. the steel structure and exterior panels were constructed in three weeks a fraction of the time that is typically associated with traditional residential construction, this saved the client time and money.


Floor Plan

The inside finishes were eliminated to reduce the cost and the time to complete the project. This is evident with the exposed metals wall panels and exposed structural beams, the exterior cladding is finished with galvalume, steel covered with zinc. The final result is a house that is clean, crisp and elegant which is a strong contrast to the natural surroundings


the 3D modelling and rendering assignment required me to create a 3D Revit model and them export the Model into 3ds Max to create photo realistic representation of the existing house.


Photos


Revit Model


3D Perspective


3ds Max


I hope you Enjoy.
The Architect of Tomorrow..

Tuesday, 29 September 2015

S01E17* Lumion 2.0

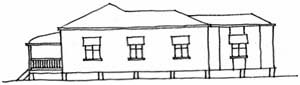
Hey Guys, I have already uploaded some of these images, but I have been working on some more, Let me know what you think, This is a modern extension for a traditional character home found in Brisbane.

Initial design and concept was done while i was working at focus architecture using the latest Archicad software, I then took the Archicad Model and imported it into Lumion to create the coloured renders. It's a great way to really bring any project to life. Its an enjoyable process watching something come to life, definitely something i would be keen to work on and develop my skills.

Please comment and let me know what you think


Archicad Sketch Views


Lumion Coloured Renders


I hope you Enjoy.
The Architect of Tomorrow..

Saturday, 26 September 2015

S01E16* Pen Sets

This week at Focus Architecture was my first chance to use the latest Archicad Software since updating the Offices archicad templates file. As part of the new version of archicad the entire office is now using the Architectural 100 pen set which is one of the default pen sets that is preloaded in Archicad original template files.

Archicad comes with several predefined pen sets that allow users to switch pen sets for the project with a simple click. When a pen is assigned to an element, you are also assigning a pen index number to that element. Each pen index number has a distinct function assigned to it.

It is important to assign the correct pen to the element or function. If the pen index numbers assigned are consistent then when it comes to switching from one predefined pen set to another ensures a consistent output.

Pen sets
* I have attached information which I have sourced directly from Archicad website


01 Colour Conceptual
Recommended for presentations and coloured plotting. 
Applied pen weights ( 0–0,13 –0,18 –0,20–0,25 –0,35) are calibrated to 1:100 scale. Colours are set mostly monochrome grayscale, but in case of certain elements (zones, terrain, cabinets, furniture) they imitate realistic display.

02 Site 500
Pen set recommended for site plans.
Applied pen weights ( 0–0,13–0,20) are calibrated to 1:500 scale.
Pens assigned to industrial specialist functions are grayed to enable visual separation in case of visible layers.

03 Architectural 100 (default) 
General architectural pen set for approval plans and design.
Applied pen weights ( 0–0,13 –0,18 –0,20–0,25 –0,35) are calibrated to 1:100 display scale. Colours are set to ease visual separation on the screen.

04 Building plans 50
Pen set optimized for construction plans. 
Applied pen weights ( 0–0,15 –0,18 –0,20–0,35 –0,5) are calibrated to 1:50 display scale. Colours are set to ease visual separation on the screen.

05 Detailing
Pen set recommended for construction plan detail drawings.
Applied pen weights ( 0–0,15 –0,18 –0,20–0,4 –0,6) are calibrated to 1:20 display scale. Colours are set to ease visual separation on the screen, and pens assigned to industrial specialist functions are greyed out.

06 Structural plans
Pen set recommended for structural plans and approval plans for structural engineers.
Applied pen weights ( 0–0,13 –0,18 –0,20–0,25 –0,35) are calibrated to 1:100 display scale. Colours are set to ease visual separation on the screen and enable visual separation in case of visible layers.

07 Mechanical
Pen set recommended for approval plans for mechanical engineers. 
Applied pen weights ( 0–0,13 –0,18 –0,20–0,25 –0,35) are calibrated to 1:100 display scale. Structural element colours are black, mechanical element colour codes are visually separated on the screen and in printing/plotting as well.

08 Electrical
Pen set recommended for approval plans for electrical engineers. 
Applied pen weights ( 0–0,13 –0,18 –0,20–0,25 –0,35) are calibrated to 1:100 display scale. Structural element colours are black, mechanical element colour codes are visually separated on the screen and in printing/plotting as well.

09 Colour
Pen set recommended for colouring plans independently to scale and line weights. Pen colours are set to include all needed tones in the pen table.

10 Greyscale
Pen set recommended for grey scale-coloured plans independently of scale and line weights. Pen colours are set to include all needed tones in the pen table.

11 Archicad 9 
The old pen table.


All pen sets have 255 pens which are arranged in 20 columns and 14 rows. The first 140 pens have defined values in all default pen sets, while pens 140-256 are kept for further user functions.

Columns in the Pen table
* I have attached information which I have sourced directly from Archicad website

Archicad have made it as easy as possible to distinguish the pens and their functions. Each column in the pen table is divided by colour groups. Each group is then assigned a general element that is linked back to a more specific function.


Pen table Column Functions from 01-20:

01 General: Elements that cannot be categorized by function, or whose function cannot be determined when configured (e.g. complex profiles or composites that can be used for multiple element types)

02 2D elements: Lines, polylines, splines, etc…

03 Openings: Doors, windows, skylights

04 Furnishing and objects: Furnishings, and every element placed as an object

05 Graphic annotations: Graphics of Dimension lines, labels, titles, frames, zone stamps, S/E markers, detail markers

06 Text annotations: Text elements of the above

07 Walls: Elements with wall functions placed by the Wall tool or any other tool

08 Columns: Elements with column functions placed by the Column tool or any other tool

09 Slabs: Elements with slab functions placed by the Slab tool or any other tool

10 Beams: Elements with beam functions placed by the Beam tool or any other tool

11 Stairs: Elements with stair functions placed by the Stair tool or any other tool

12 Roof structures: Elements with roof functions placed by the Roof tool or any other tool

13 Mesh and terrain: Elements with mesh or terrain functions placed by the Mesh tool or any other tool

14 Interior: Zones, fittings

15 HVAC: Structures, symbols and annotations displayed on architectural plans prepared for HVAC consultants

16 Structural plans: Structures, symbols and annotations displayed on architectural and structural plans prepared for structural engineer consultants

17 Electrical: Structures, objects, symbols and annotations displayed on architectural and electrical plans prepared for electrical engineer consultants

18 Graphic Fills: Fills or patterns that cannot be categorized by element type

19 Graphic Background Colours: Backgrounds of fills or patterns that cannot be categorized by element type

20 Graphic symbols and screen only colours: Hotspots, markup colours, selection highlight, and guidelines

Rows in the Pen Table
* I have attached information which I have sourced directly from Archicad website

The columns defines the general element function the rows define the attribute.


Index numbers from 1 to 140:

01 –20 General pens, library part pens

21– 40 structural elements cut lines, and 
25 markers; 26 text titles; 35 hot water; 37 power grid; 38- additional colours, graphic symbols

41–60 non-structural elements cut lines, and 
45 arrowheads; 46 bold text; 55 cold water; 57 switchboards; 58– additional colours, graphic symbols

61-80 symbols and separator lines, and  65 frames; 66 text body; 75 ducting; 76 structural plan annotations; 77 lighting; 78– additional colours, graphic symbols

81-100 uncut lines, contour lines, construction lines, cover fills, and 
85 dimension lines; 86 annotation texts; 96 gas-mains; 97 IT networks; 98- additional colours, graphic symbols

101–120 cut fills, and 
105 secondary annotations; 106 annotation text: proof; 115 mechanical equipment; 117
electrical equipment; 118- additional colours, graphic symbols

121–140 fill background colours


For more information on Pet sets or anything Archicad related please visit


I hope you Enjoy.
The Architect of Tomorrow..

Friday, 25 September 2015

S01E15* Altering Character Houses & Buildings

There are numerous things to consider when extending or renovating a character or traditional houses & Buildings. Councils will have their own acceptable solutions and requirements. This is something that I have encountered in various projects while working at Focus Architecture. Many people that live in a character house will want or need to extend the property to cater for changing lifestyle or needs. Traditionally this extra space was achieved with enclosing verandah’s and more recently has been either building underneath or extending.However it’s the aim of the council to ensure that any alterations are done in a sympathetic way to maintain the form and character of the original building and to ensure that the original streetscape is maintained and preserved. 

This is a Project in Kangaroo point which I have recently designed while working at Focus Architecture. The house is a traditional character house with a modern extension at the rear. The new extension follows the guidelines defined as part of altering character houses within Brisbane.

Firstly the new extension has been built at the rear this maintains the original streetscape and doesn't detract from the character of the street.

The extension doesn't conflict with the already established roof shape or pitch and also maintains the original ridge line. 

The extension doesn't try to mimic the original style of the house, Instead the extension shows a clear point of difference from the existing house creating a clear visual break. This has been achieved using both a change in wall cladding and openings but still maintaining the lightweight style of construction.


* I have attached information which I have sourced directly from Brisbane City Council website which explains appropriate and inappropriate solutions and also provides examples for altering character houses and buildings

Building on to the house Adding an extension
  • Make the new work sympathetic but do not try to mimic the style of the existing house
  • Build at the rear to maintain the streetscape presence of the character house
  • Distinguish old from new minor extensions by setting back the new wall line a minimum of 500mm from the existing wall or create a clear visual break, such as an expansion joint, changes in wall cladding, a recess or a full-height opening. 

The pavilion extension is a highly recommended way of increasing the size of a traditional house. The pavilion extension, although occupying yard space, allows for the retention of the original form, its relationship to the ground, and the streetscape character of the earlier building. It enables modern facilities and lifestyle preferences to be incorporated into the new extension. 

Inappropriate extensions
  • Inappropriate use of materials such as masonry as opposed to lightweight construction
  • Extending into the roof to create more space or to take advantage of views
  • Extending the form of the building without a clear visual break
  • Additions which overhang the existing building
  • Additions which significantly alter the shape and character of the original roof

Examples of altering character houses and buildings

Suitable
Suitable contemporary extension: a major rear extension separated by an unobtrusive, glaze or partially open link to the house.

 
ü
Suitable traditional extension: the extension is well differentiated as a minor volume attached to the house.
 
ü


Unsuitable
Unsuitable extension: a rear skillion-roof extension in masonry and built on a concrete slab.

û
Unsuitable extension particularly on a street corner: a rear extension extruding the built form. Roof-line creates a bulky out-of-scale building in the street.
û


I hope you Enjoy.
The Architect of Tomorrow..

Sunday, 13 September 2015

S01E14* - Archicad Template File

We have recently upgraded our Archicad software in the office and I spent the day updating the office's Archicad template file. The office template file helps to reduce wasted time and aims to eliminate any inconsistencies when working on a new project by reducing the need to do repetitive tasks. The more projects I work on the more time is saved using a current and accurate template file that is specific for the type of work we do.

Key template data

•         Drawings and Story Settings
•         Company Title blocks and Layouts (North Points/Scale Bar)
•         Section and Elevation markers
•         Layers
•         Layer Combinations
•         Pen Settings
•         Line Types
•         Fill Types
•         Composite Structures
•         Profiles and Work Environment settings
•         Surfaces
•         Schedules
•         Model View Options
•         Objects
•         Accessibility doors with minimal Clearance standards
•         Palettes and toolbars

Having a standardised template file in an office environment improves the efficiency of staff while also ensuring that each project is identical in the final output. See below steps to create a customised template using Archicad


To create a customized template

1.            Open a new empty project file.
2.            Edit your project preferences, set up the project structure and/or place elements.
3.            Save this project file as a template: use File > Save as, and choose “ArchiCAD            Project Template (*.tpl)” as the file type.

These files are saved to the “Templates” folder, located here:
On PC: Documents and Settings\user\Graphisoft\ArchiCAD Templates.
On MacOS: Library\Application Support\Graphisoft\ArchiCAD Templates.

To open a template

1.            Choose the File > New command
2.            Select the Use a Template option
3.            Select the desired template file.

When starting a new project based on a template, you are in fact opening a copy of this template file as “Untitled.”

Note: Settings of the Work Environment Profile used to open your project will override Template file settings.

All this information on creating a Template your own template files can be found on the Archicad Website - http://helpcenter.graphisoft.com/tips/template-files/

I hope you Enjoy.
The Architect of Tomorrow..